April 17, 2012

My Favorite Things Stamps - Pure Innocence Sweet Safari VIP Collection!


Hello Stampin' friends! Welcome to the MFT Pure Innocence VIP kit Product Tour! This Sweet Safari VIP kit gives you the opportunity to purchase the upcoming Pure Innocence stamp sets and a new Die-namics die TWO WEEKS early from the May release date. You will also receive an EXCLUSIVE Mini Sentiment stamp set with this offer. The mini set will never be available for purchase again. The Pure Innocence Sweet Safari VIP Collection $33.95 - includes....Pure Innocence Giraffe Girl stamp set, Pure Innocence Freckles stamp set, Sweet Safari Sentiments mini (VIP exclusive stamp set - will never be offered for sale or be available again $9 value, FREE) and the Large Royal Rose Die-namics Die. The VIP collections always go SO quickly and I know this Sweet Safari VIP Collection will too....so don't wait too LONG on this one, smile!
Photobucket
 Here are my cards today featuring the adorable Pure Innocence Stamp sets and Die-namics die from the Sweet Safari VIP Collection. First up, is Pure Innocence Giraffe Girl....gosh I love this sweet stamp....SO cute!!! I coloured her and the Giraffe with my Copics and Paper Pieced her outfit! I used one of the many cute sentiments from the Giraffe Girl Stamp set but I think this one is my fave. The papers are BasicGrey Origins 6x6 pad.

Photobucket
and here is the inside of the Giraffe Girl card. I've used one of the sweet sentiments from the EXCLUSIVE VIP mini Sentiment set. This set comes FREE in the VIP kit and will not be available for purchase again.
Photobucket
Next up is the cute girlie from the, Pure Innocence, Freckles Stamp set. I just adore her...I coloured her with my Copics and paper pieced her outfit. I also used the Large Royal Rose Die-namics that comes in the VIP Sweet Safari Kit and cut it from My Favorite Felt, Bubblegum Pink. They Royal Leaves are cut from My Favorite felt, Jellybean Green. I stamped part of one of the sentiments that comes in the PI Freckles set on the Notched Tag Die-namics. The papers are BasicGrey Konnichiwa 6x6 pad.
Photobucket
 Here is the inside of my card and I stamped the second part of the sentiment on the sweet Stack Die-namics set.

Well, Thanks SO much for stopping by and having a wee peek at my cards and the details about the fabulous new Pure Innocence VIP Collection. Swing on over to Kim's Blog for a list of all the MFT Designers with inspiration to share and click here to go and add the Sweet Safari VIP Collection to your cart....it is only available while limited quantities last.

Have a Stampin' Great Day!!!!
Hugs,


SUPPLIES:


April 11, 2012

My Favorite Things Stamps...WSC # 67...That Stinks!

Photobucket

Hey Stampin' friends! It's time to get sketchy at the MFT Wednesday Stamp Club! I love this week's sketch and I am sure you will too! Join the MFTWSC67, a great way to use your MFT stamps and Die-namics!!!

If you join us, be sure to get your entry into the Splitcoaststampers Gallery by Tuesday, April 17th at noon EST for your chance at our weekly prize and use the keyword MFTWSC67! The random winner will receive a $15 dollar gift voucher! If the lucky winner uses MFT stamps, they will receive 5$ bonus bucks, for a total of a $20!!!

Photobucket
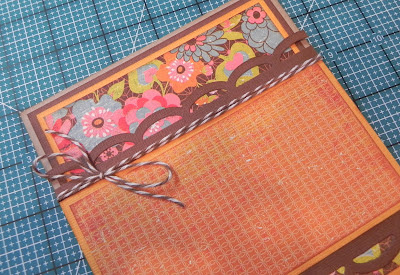
For my card today, I inked up this super cute MFT A La Modes stamp set called It's Getting Deep! I just LOVE her to bits. I am in paper LOVE too with this new, BasicGrey Konnichiwa pad! So, I coloured up the ALM girl with my Copics and paper pieced her cute outfit, then fussy cut her out and popped her up on foam dots. I swapped out the rectangle panel in the sketch to use my OVAL STAX Die-namics...love, love, love the new STAX Die-namics!  I used my Open Scallop Border Die-namics die and cut it from both brown and orange cardstock and then inserted the negative bits from the orange die cut into the brown border die cut.  I used the Dog Tag Die-namics and stamped my fave sentiment from the It's Getting Deep set on it. I also added some Cappuccino Twinery Twine.

I have a little trick on how I tie bows on all my cards with ribbon and twine. I first saw this tip on Jennifer McGuire Ink blog many years ago when I scrapbooked. Maybe you know this tip but I just thought I would share a really easy and fool-proof way to tie a bow, without the need to call in your hubby or one of the kids to put a finger on the ribbon while you tie the bow, smile.

 First, punch a hole where you want the bow to be positioned. If you are using a thick ribbon or twill tape you will need a bigger hole for both tails to fit through. With twine punch a smaller hole so that the hole is covered by the twine.
Then feed the twine in through the hole from the back of the card.
 and pull the twine through to the front of the card.
 Now take the twine tail that is on the underside of the card and bring it around. Wrap it around as many times as you want to the back.
 then take that end and pull it through the hole too.
 Now, both tails are on the top of the card. Position either tale of the twine or ribbon on either side of the twine that is running across the length of the card.
 Now tie your bow and then trim the tails.
This is the card after and I wrapped the twine. I ended up wrapping it around twice. I hope you found this tip to be helpful!

Photobucket
Here is the inside of my card....I stamped the It's getting Deep, ALM girl again and used a sentiment from the MFT ALM Face Time stamp set.

Well, thanks so much for stopping by and having a wee peek at my card for the MFTWSC67! Take a swing on over to Kim's blog and see a list of all the MFT designers with some sketchy inspiration for you today!

Happy Stampin'!
Hugs,


SUPPLIES:


April 10, 2012

MFT Creative Challenge, It's all About Mom!

Photobucket


Hello Stampin' Friends! Welcome to our Design Team Creative Challenge, a monthly feature, where we challenge our design team to explore their creative side with a specific theme, product or technique. This month "it's all about Mom!" Be Sure to check out the MFT blog to see a list of all the designers with creative project ideas for you today!

Photobucket
I'm sharing a card and wine bottle tag that I made for my Mom for Mother's day! I used this super cute Pure Innocence Cute-A-Tude girl, that I just LOVE! My mom's favourite colour is red (and I love it too) so I pulled out these beautiful Echo Park, This & That Graceful 6x6 papers for the card. I coloured the PI girl with my Copics and paper pieced her dress, then popped her up on the panel created with the Oval STAX Die-namics and the Decorative Doily Die-namic. I also used the Monarch Border Die-namics and Pinking Edge Die-namics.

I created the sentiment by stamping the "I love you" stamp from the PI Rose set and the word "Mom" from one of the sentiment stamps in the PI Cute-A-Tude set. then I cut it out using Joanne B.'s "cut and re-cut technique" with the Chat Bubble Die-namics. To embellish I used some white cotton lace trim and Cherry Blossom flowers with the Royal Leaves Die-namics and of course, lots of pearls...I love me some pearls, if you haven't noticed, smile!

The wine bottle tag was created with the Let's Toast Stamp and Die-namics set, the Fishtail Flags STAX Die-namics, Oval STAX Die-namics and the Decorative Doily Duo and embellished to coordinate with the card.
Photobucket
Here is the inside of my card...I stamped the PI Cute-A-Tude girlie again. Here is another sentiment that I created with 2 different sentiment stamps just like on the front of the card. One from the PI Rose set and then the word "Mom" from a sentiment from the PI Cute-A-Tude! A little tip on how I do this...I ink only the portion of the sentiment stamp that I want to use. I find that my little Memento Dew Drop inks work well for getting the ink in the precise spot. I wipe away any ink that accidentally ends up on any of the surrounding letters with a baby wipe or my finger. I find that if I stamp the last word(s) first, it is easier to line up the beginning part of the sentiment, that is from another stamp. 

Well, thanks so much for stopping by and having a wee peek at my project for this month's MFT Creative Challenge! Please swing on over to the MFT blog to the listing of designers that have Mother's Day inspirational projects!

Happy Stampin'!
Hugs,


SUPPLIES:


April 04, 2012

My Favorite Things Stamps...WSC # 66...You Saved the Day!


Photobucket
Hello stampin' friends! Thanks for popping by today! So, wasn't that a wonderful week of MFTeasers for the new April release!? What a stampin' rush that was, smile!!! Well, we have even more FUN for you with a new sketch for this week's Wednesday Stamp Club a great way to put all those new MFT stamps and Die-namics to work!
If you join us, be sure to get your entry into the Splitcoaststampers Gallery by Tuesday, April 10th at noon EST for your chance at our weekly prize and use the keyword MFTWSC66! The random winner will receive a $15 dollar gift voucher! If the lucky winner uses MFT stamps, they will receive 5$ bonus bucks, for a total of a $20!!!
Photobucket

So, for my card I have inked up this hard-working, Pure Innocence, Policeman, out there patrolling his beat and saving the day! I coloured him up with my Copics and made my card with BasicGrey Oliver 6x6 papers. I used the New Chevron Stripes Border  Die-namics and tucked it under the panel to replace the scallop on the sketch.  I used the New Circle STAX Die-namics set 1 and 2...they are a staple item for you Die-namics collection. I also added a few Stars with the Stacking Stars Die-namics and I stamped one of the cute sentiments that comes in the set on paper cut out with the ribbon die from the First Place Award Ribbon Die-namics.

Photobucket
 Here is the inside of my card. I stamped the little PI Policeman again and a portion of one of the other sentiment from the set! Well, I hope you get a chance to play along with us this week at the MFT Wednesday Stamp Club. If you do, don't forget to upload your card to the Gallery at Splitcoaststampers! Now swing on by Kim's Blog and see the list of links to all the MFT Designers joining in on the MFTWSC66 this week! 

Have a Stampin' Great Day!!!
Hugs,


SUPPLIES:


April 03, 2012

My Favorite Things...April Release, New Product Tour...I need you...!


Photobucket

 Yay! It is MFT release night and all the Brand Spankin' New Stamps and Die-namics are now available. Before you run off to do a little shopping, we have a little New Product Tour hop for you, that means blog candy has been hidden somewhere along the line! Be sure to leave comments as you visit for your chance at the prize! Now, head on over to Kim's blog to see a list of all the New Stamps and Die-namics that are being featured for the New Product Tour by the MFT Designers.

Photobucket
I have a card to share featuring the Pure Innocence Scientist....she is is super cute and I think would make a fabulous valentines card but really she is very versatile and perfect for any occasion. I used the pretty MME Love Me paper and used the the fabulous new Banner Day STAX Die-namics to make this fun banner. I also used the negative portion after cutting with the new Pinking Edge Die-namics and layered 3 pinked edges and two little bows with some Shore Twinery Twine. I paper pieced the little PI Scientist girl and I stamped a few bubbles coming out of her beaker with the bubbled stamp from the PI Blowing Bubbles Stamp set.  She is pop-dotted on a  panel made with the Dizzy Doily Duo and the new fabulous Circle STAX Die-namics. I also tucked in the larger of the two Chevron Stripes Border Die-namics under the middle panel. I stamped only part of the sentiment from the PI Scientist set and on white card cut with the Chat Bubble Die-namics and stamped the rest of the sentiment on the inside panel. 
Photobucket
Here is the inside...I stamped the PI Scientist girl again in Ladybug Memento Ink and made another panel with the Layered Labels Die-namics, the Dizzy Doily Duo, the Circle STAX Die-namics and the First Place Award Ribbon Die-namics.

Well, thanks so much for stopping by and having a wee peek at my card for the MFT New Product Tour. I hope that you were inspired by all the wonderful teasers by the MFT Designers this week! I thoroughly enjoyed my first week of Teasers as a MFT Designer (still have to pinch myself :)) and I'm SO looking forward to many more!!! Now, please hop on over to Kim's blog for a list of all the MFT Designers with inspiration to share and don't forget to leave those comments as you visit for a chance at some MFT Blog Candy!

Happy Shopping!
Big Hugs,


SUPPLIES:

April MFT Die-namics Feature and Pre-Release Pep Rally!


Photobucket


Hello Stampin' friends! Well, now that we've teased and tempted you all week long, it's almost time for you to shop for your favorite Brand Spankin' New products from MFT.

But first... it's time for our Die-namics Feature and Pre-Release Pep Rally!

Our Design Team has been busy creating jaw-dropping and inspiring projects for you, and we've saved the best for last.

We've taken an in-depth look at this month's Die-namics, while re-visiting the amazing sets being released tonight at 10 PM EST RIGHT HERE in the MFT Boutique.
And while we are at it, how about we make your life even easier with a "cheat sheet" of all that's new?  Head over to the MFT Blog to print out a shopping list.
Photobucket
So, for my card today, I am using this little doll, Pure Innocence Dress Up Diva, and I coloured her with my Copics. I really took my time colouring her up, her pretty dress really lent to colouring in some pleats. I worked at getting the highlights just so...still not totally happy with it but will keep practising. I used this pretty, Howdy Doody, MME 6x6 paper, such a lovely colour combo. I made lots of flowers with the Pretty Posies Die-namics, the Regal Rose Die-namics and the new Regal Rose Leaves Die-namics.

I am totally loving the new Die-namics STAX...aren't you!? What a fabulous creation and a must-have item! The STAX Die-namics, stack beautifully leaving a nice thin border when layered alternately from both the STAX1 and STAX2 and they emboss effortlessly! The STAX Die-namics  are a thin metal die and have a plastic backing so you can see through them to get the prefect positioning of your stamped images, HERE is a link to a video by MFT Designer, Jody, giving a tour of the Oval STAX!

 I've put together a little photo tutorial showing how to use the Circle Die-namics STAX to make a mask so you can ink the background of your image with Distress inks...one of my favourite things to do!!!
Photobucket
 But before I share my photo tutorial, here is the inside of my card. I stamped another one of the sweet sentiments that comes in the PI Dress Up Diva set and I used the Fishtail Flags STAX and stamped the PI girl again too.

 Photobucket
So here's the photo tutorial...it is a bit long, sorry!
First cut a circle from plain cardstock, Eclipse Tape or another masking tape using the same size STAX Die-namics as you used to cut out and emboss your image. I have used a large circle STAX die from STAX set 1.

 (Note: I have tried this technique with the 6" wide Eclipse Tape too and it worked beautifully. If you use the Eclipse Tape you can eliminate some of the steps that I have shown here because it has a low-tack adhesive backing. I found this tip works equally well with both the cardstock and masking tape.)
Photobucket
Then using the next size down from the Circle STAX 2, align the smaller die in the centre of the cardstock circle and run it through your die-cutting machine again. You will be left with a thin circular frame that we will use as our mask.
 Photobucket
 This is where the Eclipse tape is handy as it has a low-tack adhesive backing on it but I just added some temporary dot adhesive to the cardstock frame mask so I can adhere it over the embossed edge of my image.
Photobucket
 adhere the mask around the embossed edge of your image. (I usually colour my image first but this is just a sample)
 Photobucket
 Ink around the image with your Distress inks, ink blending applicator tool, ink blending foam pad and a Non-Stick Craft sheet. I find that I get the best results inking when on a slick surface as the foam applicator glides better.

Photobucket
Remove the mask and remove any little bits of temporary adhesive that my be on your image. If you use the Eclipse tape there is no adhesive residue left behind. You can save your cardstock mask and use it again but I found that when I removed the Eclipse Tape mask it lost its shape because it is such a thin frame and the masking tape is very thin. It may be difficult to re-use a thin Eclipse Tape mask a second time.

 Photobucket
 Thanks SO much for sticking to the end of this long post!!! I really wanted to show that you can use your MFT STAX Die-namics to make a mask and then ink the background and have that crisp white embossed edge!

Here are the details about the upcoming release on April 3rd at 10 PM EST:
  • You can attend the New Release Party on April 3rd from 8-10 PM EST HERE in the MFT forum, where you can enjoy fun, games, and PRIZES!
  • The MFT release, including all new stamp sets and Die-namics, is on April 3rd at 10 PM EST.  You'll find all the newest products HERE at release time.
  • You have just a few more hours to submit your entry for this month's guest designer contest.  Check out the forum for details on how YOU can win $200 in stamp sets and Die-namics, and play along with the MFT Design Team for a month.
  • If you'd like to see all the designers' posts for today, please click on over to the MFT Blog NOW.  Be sure to leave comments as you go for the chance to win one of 2, $10 gift certificates given away daily.  The winners will be posted on April 3rd just before the release party, on the MFT blog.
Have a Stampin' Great Day!
Hugs,


SUPPLIES:


LinkWithin

Related Posts with Thumbnails